Storage
Overview
The Storage section allows administrators to mount and manage network storage shares that G-Immute uses for backup repositories. Supported protocols include CIFS (Network Shared) and iSCSI. Once mounted, these shares appear as local folders that backup jobs can read from and write to.
Storage Page — Initial View
To access the Storage page, click on STORAGE from the left navigation menu. This is how the Storage page looks when you first open it with no shares mounted yet. It shows the Mount Network Share form with the protocol dropdown, the iSCSI section, and a message showing no mounted shares found.
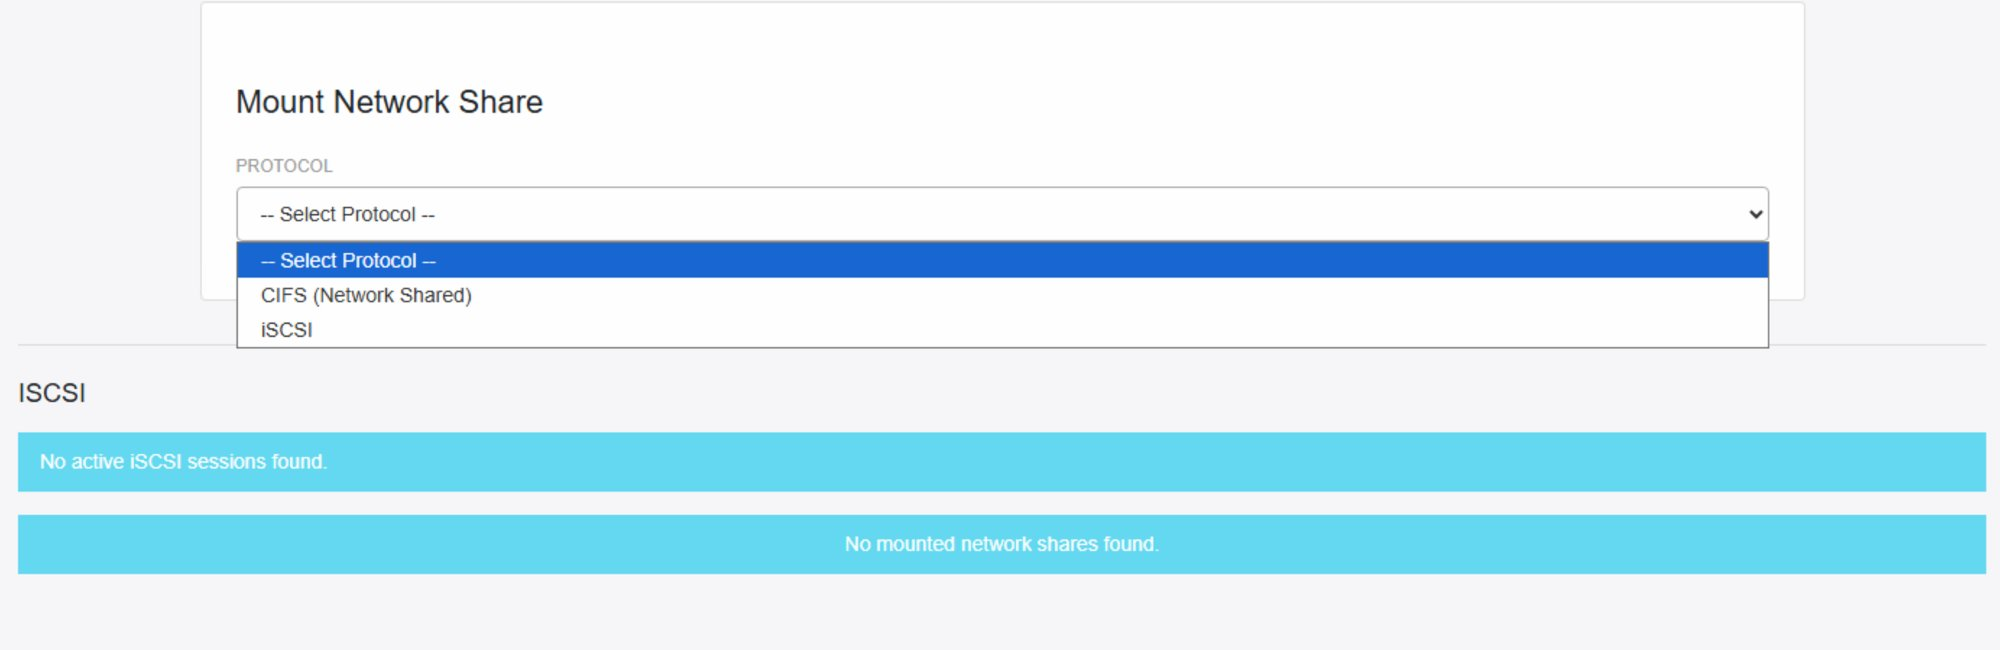
Figure 6 — Storage Page — Initial View (no shares mounted)
| Element | Description |
|---|---|
| Mount Network Share | The form at the top used to add a new network share. Click the Protocol dropdown to begin. |
| PROTOCOL dropdown | Select the type of network share to mount. Two options are available: CIFS (Network Shared) and iSCSI. |
| CIFS (Network Shared) | Used to mount Windows or Samba-based network shared folders over the network. Requires a network path, local mount folder, folder type, username, and password. Ideal for connecting to shared drives on Windows servers or NAS devices. |
| iSCSI | Used to mount iSCSI block-level storage targets over the network. Requires a target IP address, target discovery, and login. Ideal for high-performance block storage used in enterprise backup environments. |
| iSCSI section | "No active iSCSI sessions found." — shown when no iSCSI targets are currently connected. |
| No mounted network shares found | "No mounted network shares found." — shown when no CIFS/Samba shares have been mounted yet. |
Mounting a CIFS (Network Shared) Share
Step 1 — Select Protocol
To mount a new network share, click the PROTOCOL dropdown in the Mount Network Share form. Two options are available:
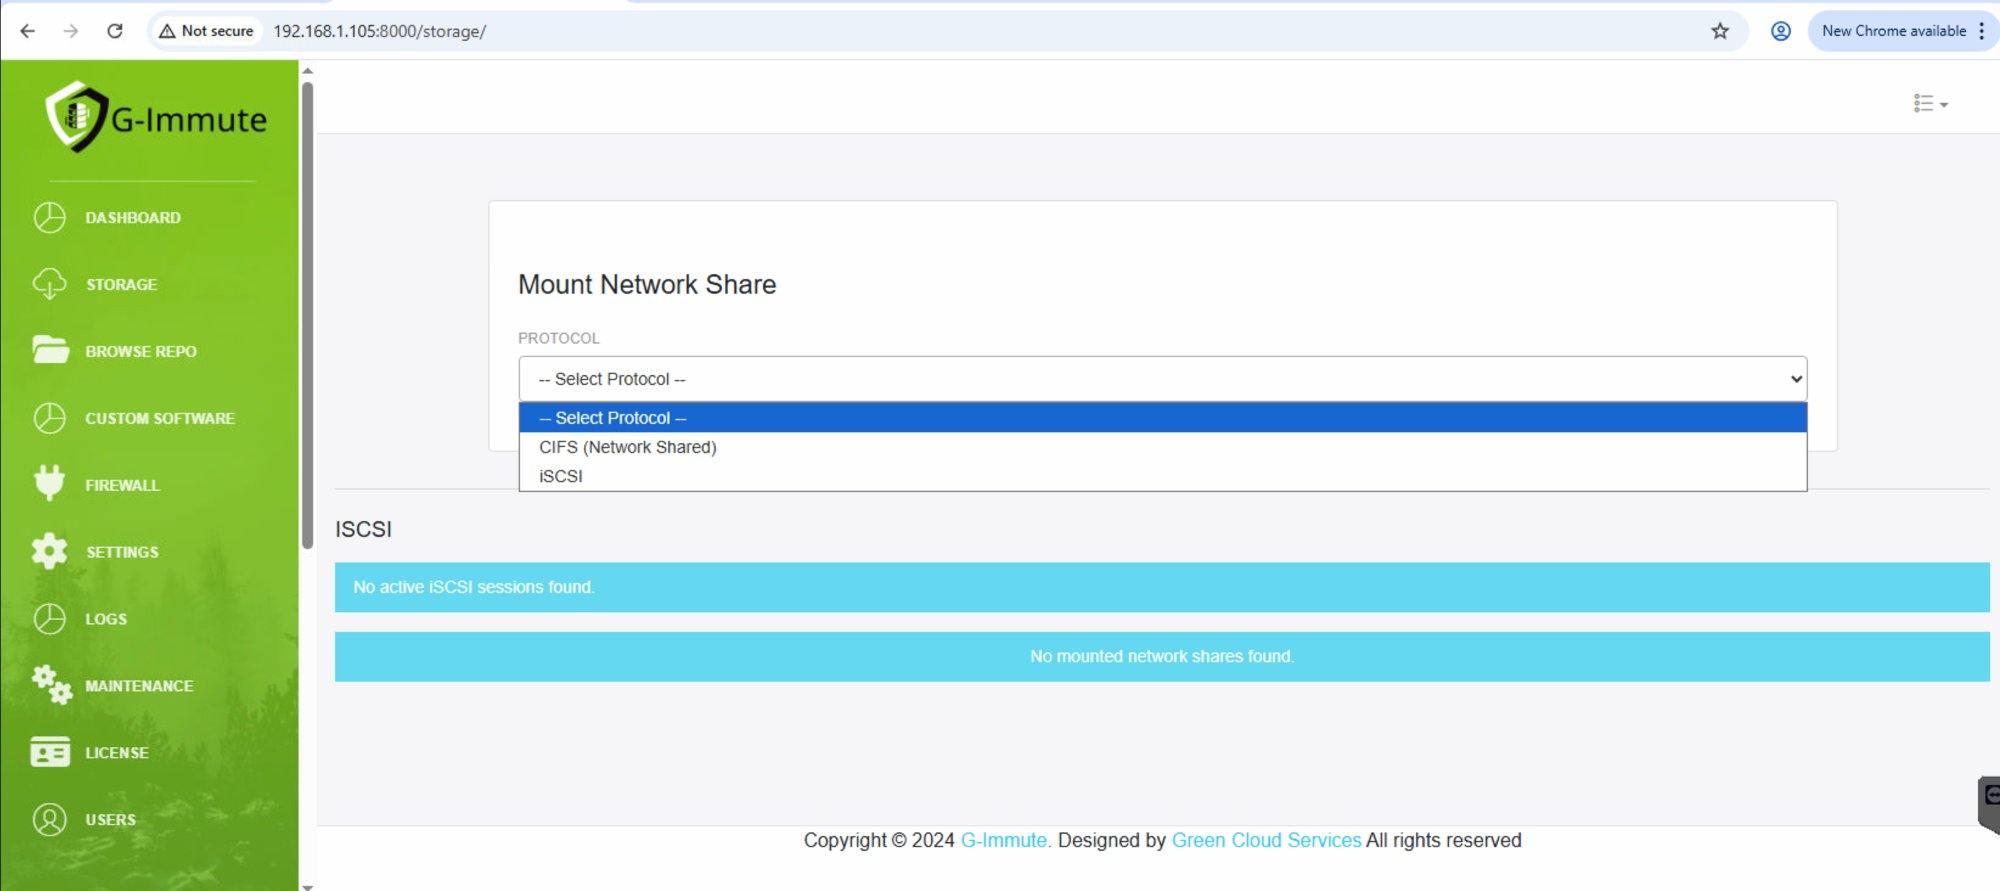
Figure 7 — Protocol dropdown showing CIFS and iSCSI options
| Element | Description |
|---|---|
| CIFS (Network Shared) | Select this for mounting Windows or Samba-based network shared folders. Requires a network path, credentials, and folder type. |
| iSCSI | Select this for mounting iSCSI block-level storage targets. Used for direct block storage access over a network. |
Step 2 — Fill in CIFS Details
After selecting CIFS (Network Shared), the form expands to show all required fields. Fill in each field as described below and click Mount & Save to connect the share.
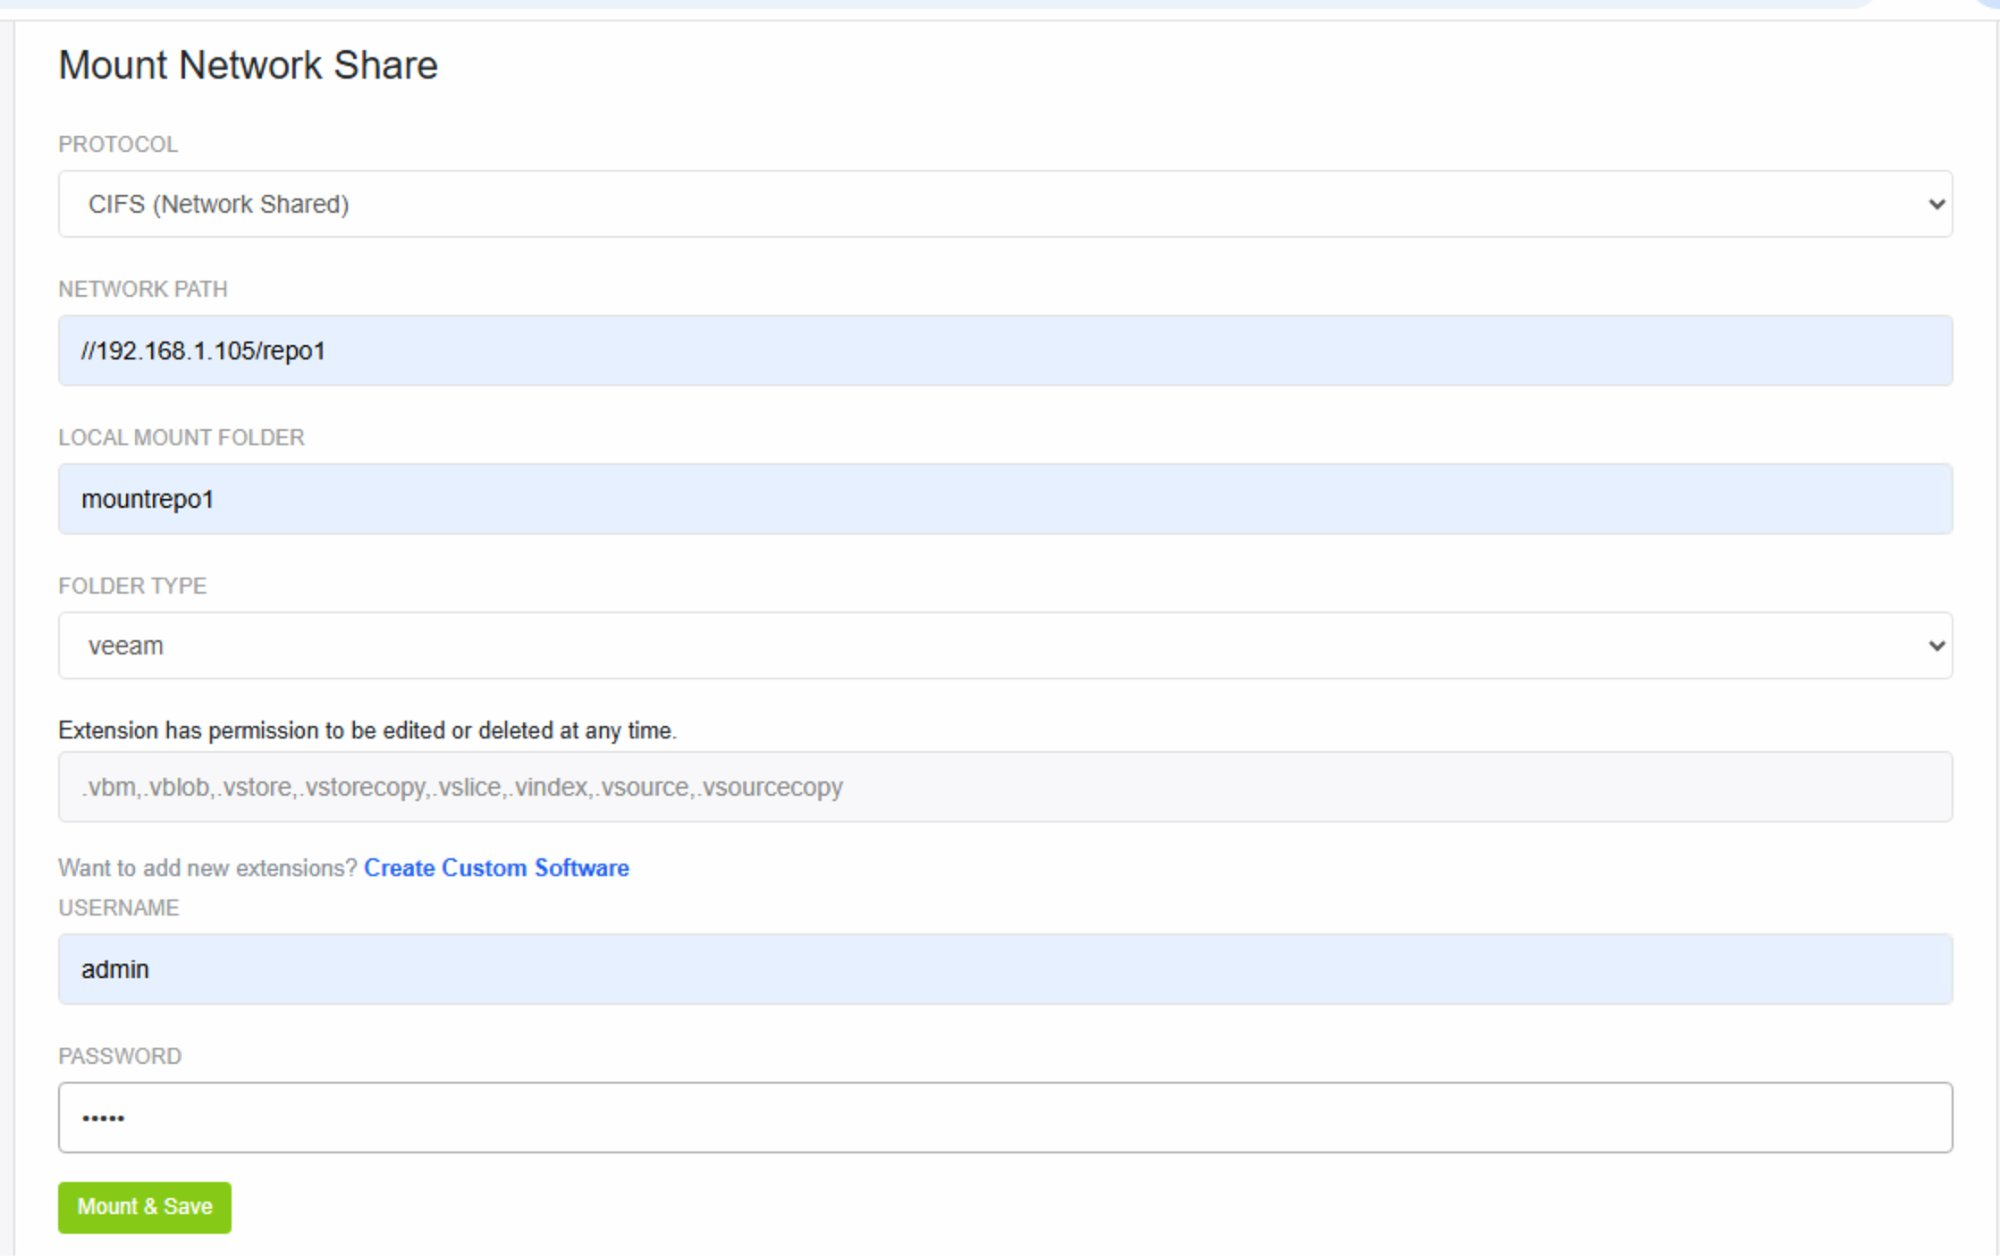
Figure 8 — CIFS Mount Network Share Form filled in
| Element | Description |
|---|---|
| PROTOCOL | Set to CIFS (Network Shared) for mounting Windows or Samba network shares. |
| NETWORK PATH | The UNC path to the remote shared folder. Example: //192.168.1.105/repo1 |
| LOCAL MOUNT FOLDER | The local folder name where the share will be mounted on G-Immute. Example: mountrepo1 (saved at /srv/mountrepo1) |
| FOLDER TYPE | Select the backup software type using this share. Example: veeam. Determines which file extensions are managed. |
| Extensions | File extensions G-Immute can edit or delete. Example: .vbm, .vblob, .vstore, .vstorecopy, .vslice, .vindex, .vsource, .vsourcecopy |
| USERNAME | Username to authenticate to the remote network share. Example: admin |
| PASSWORD | Password for the network share, entered securely (masked with dots). |
| Mount & Save button | Click this green button to mount the share and save the configuration permanently. |
To add custom file extensions not listed, click the "Create Custom Software" link next to the extensions field.
After Adding CIFS — Storage Page Result
Once the CIFS share is successfully mounted by clicking Mount & Save, the Storage page updates automatically. The mounted share now appears in the SAMBA SHARES table at the bottom of the page.
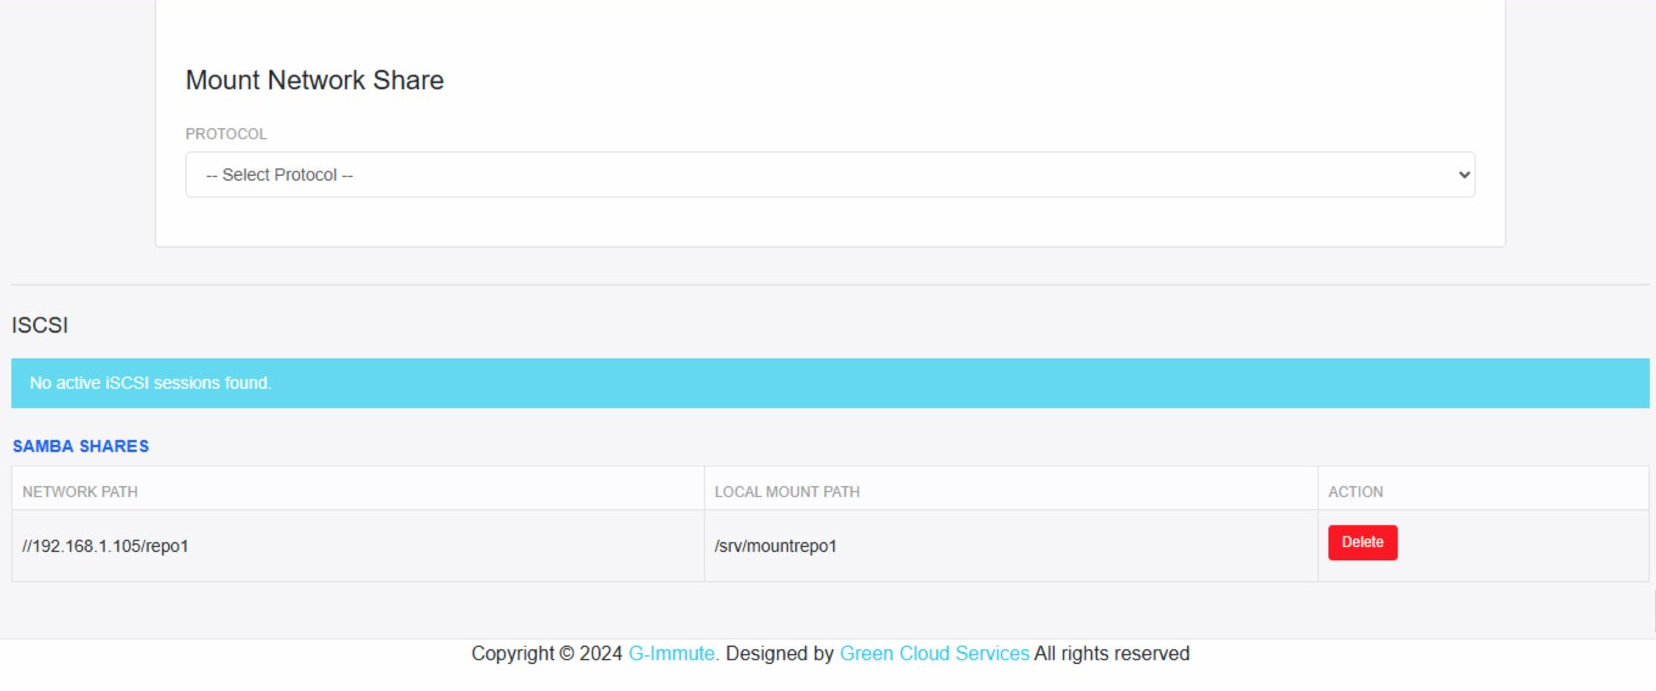
Figure 9 — Storage page after CIFS share successfully added
| Element | Description |
|---|---|
| SAMBA SHARES table | Appears at the bottom listing all successfully mounted CIFS/Samba shares. |
| NETWORK PATH | The remote UNC path of the mounted share. Example: //192.168.1.105/repo1 |
| LOCAL MOUNT PATH | The local path on G-Immute where the share is accessible. Example: /srv/mountrepo1 |
| ACTION — Delete | Click the red Delete button to unmount and remove the share from the system. |
| iSCSI section | Shows "No active iSCSI sessions found" when no iSCSI targets are connected. |
The mounted share is now available for use as a backup repository. You can add more shares by repeating the Mount Network Share steps above.
Unmounting a Share — Confirmation Message
To remove a mounted share, click the red Delete button next to it in the SAMBA SHARES table. G-Immute immediately unmounts the share and displays a confirmation popup confirming the operation was successful.
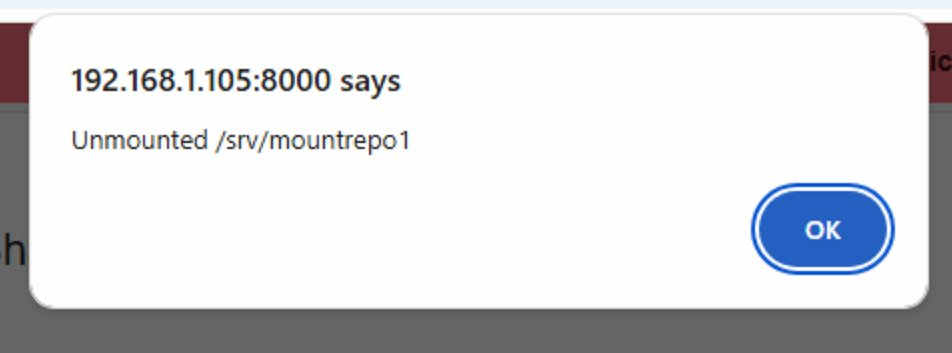
Figure 10 — Unmount confirmation popup message
| Element | Description |
|---|---|
| Confirmation popup | A browser dialog appears confirming the share has been successfully unmounted. |
| Message shown | "Unmounted /srv/mountrepo1" — confirms the local mount path has been released. |
| OK button | Click OK to dismiss the dialog. The share will no longer appear in the Samba Shares table. |
After unmounting, the backup data on the remote share is NOT deleted. Only the local mount point is removed from G-Immute. The share can be re-mounted at any time.
Mounting an iSCSI Target
Overview
iSCSI (Internet Small Computer Systems Interface) allows G-Immute to connect to block-level storage targets over a network. Unlike CIFS which mounts shared folders, iSCSI provides direct block storage access — ideal for high-performance backup workloads. To mount an iSCSI target, select iSCSI from the Protocol dropdown on the Storage page.
Step 1 — Fill in iSCSI Details & Discover Target
After selecting iSCSI from the Protocol dropdown, the form expands to show the iSCSI configuration fields. Enter the target IP address and click Discover Target to find available iSCSI targets on the network.
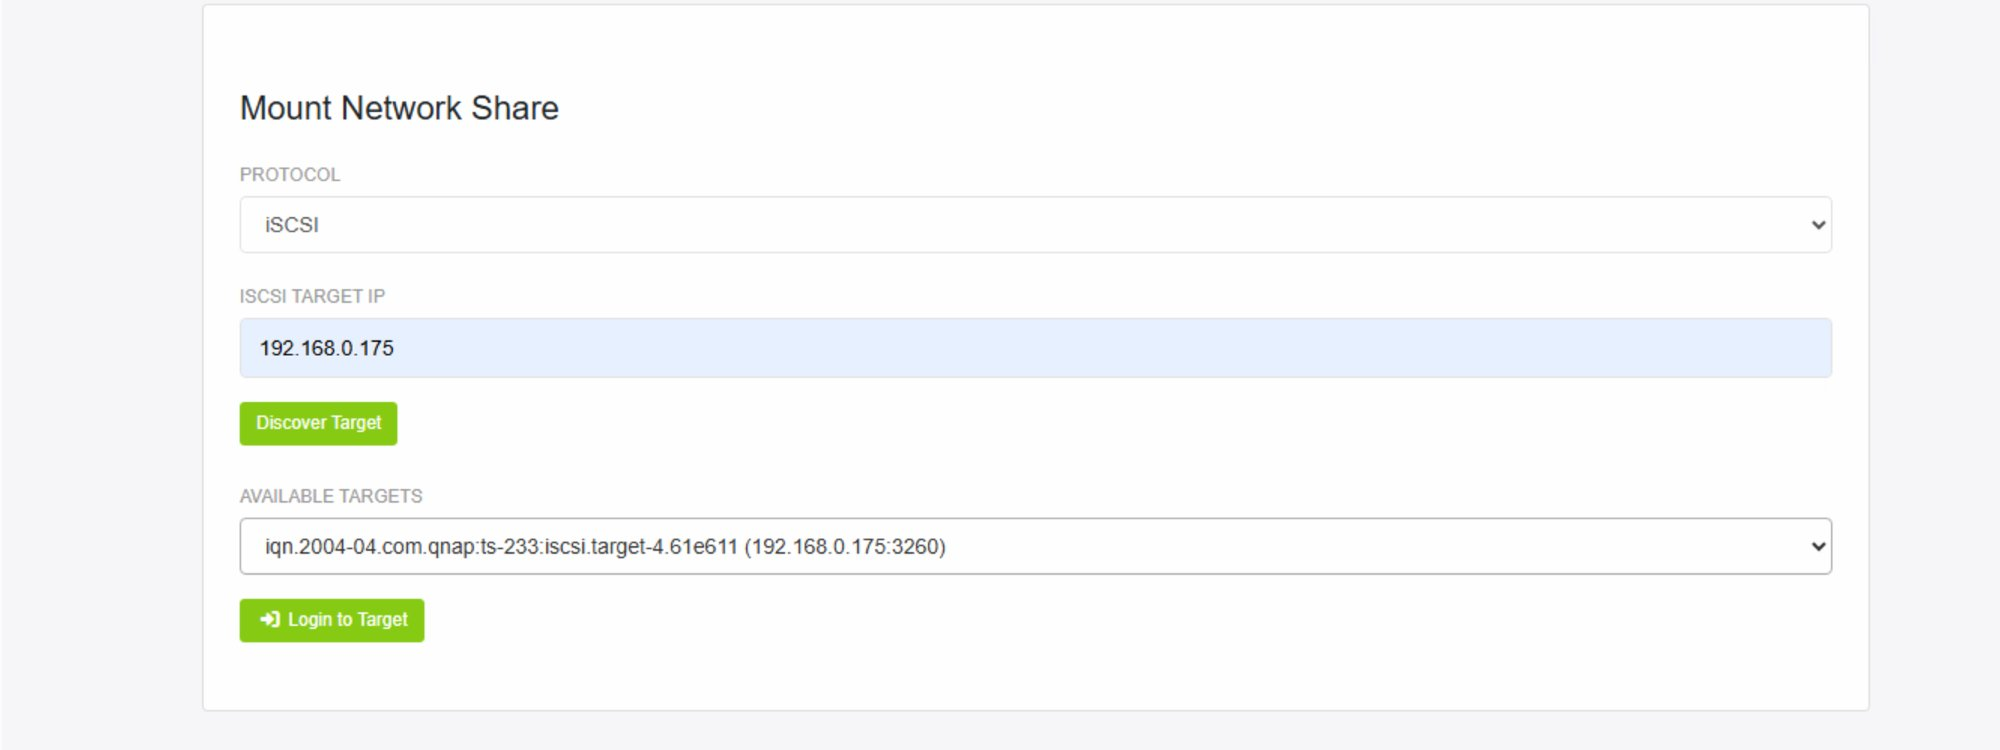
Figure 11 — iSCSI Mount Network Share Form
| Element | Description |
|---|---|
| PROTOCOL | Set to iSCSI for connecting to block-level storage targets over the network. |
| iSCSI TARGET IP | Enter the IP address of the iSCSI storage device/server. Example: 192.168.0.175 |
| Discover Target button | Click this green button to scan the target IP and find all available iSCSI targets on that device. |
| AVAILABLE TARGETS | Dropdown listing all discovered iSCSI targets on the entered IP. Example: iqn.2004-04.com.qnap:ts-233:iscsi.target-4.61e611 (192.168.0.175:3260) |
| Login to Target button | Click this green button to connect (log in) to the selected iSCSI target and mount it on G-Immute. |
Step 2 — Login Successful Confirmation
After clicking Login to Target, G-Immute attempts to connect to the selected iSCSI target. If the connection is successful, a confirmation popup is displayed.
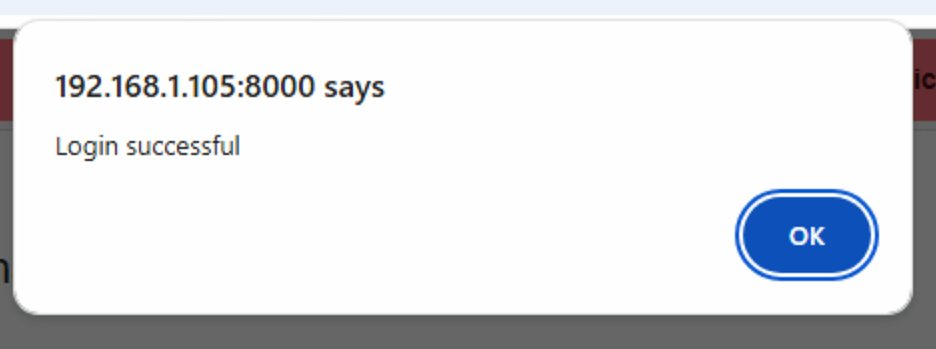
Figure 12 — iSCSI Login successful confirmation popup
| Element | Description |
|---|---|
| Confirmation popup | A browser dialog appears confirming the iSCSI target has been successfully connected. |
| Message shown | "Login successful" — confirms G-Immute has logged in to the iSCSI target. |
| OK button | Click OK to dismiss the dialog. The iSCSI session will now appear in the iSCSI section of the Storage page. |
After a successful login, the iSCSI target will appear as an active session in the iSCSI section of the Storage page. The connected storage can then be used as a backup repository.
Step 3 — Create Partition
After a successful iSCSI login, the Create Partition dialog appears automatically. This allows you to configure how the iSCSI storage device will be partitioned before it can be used as a backup repository.
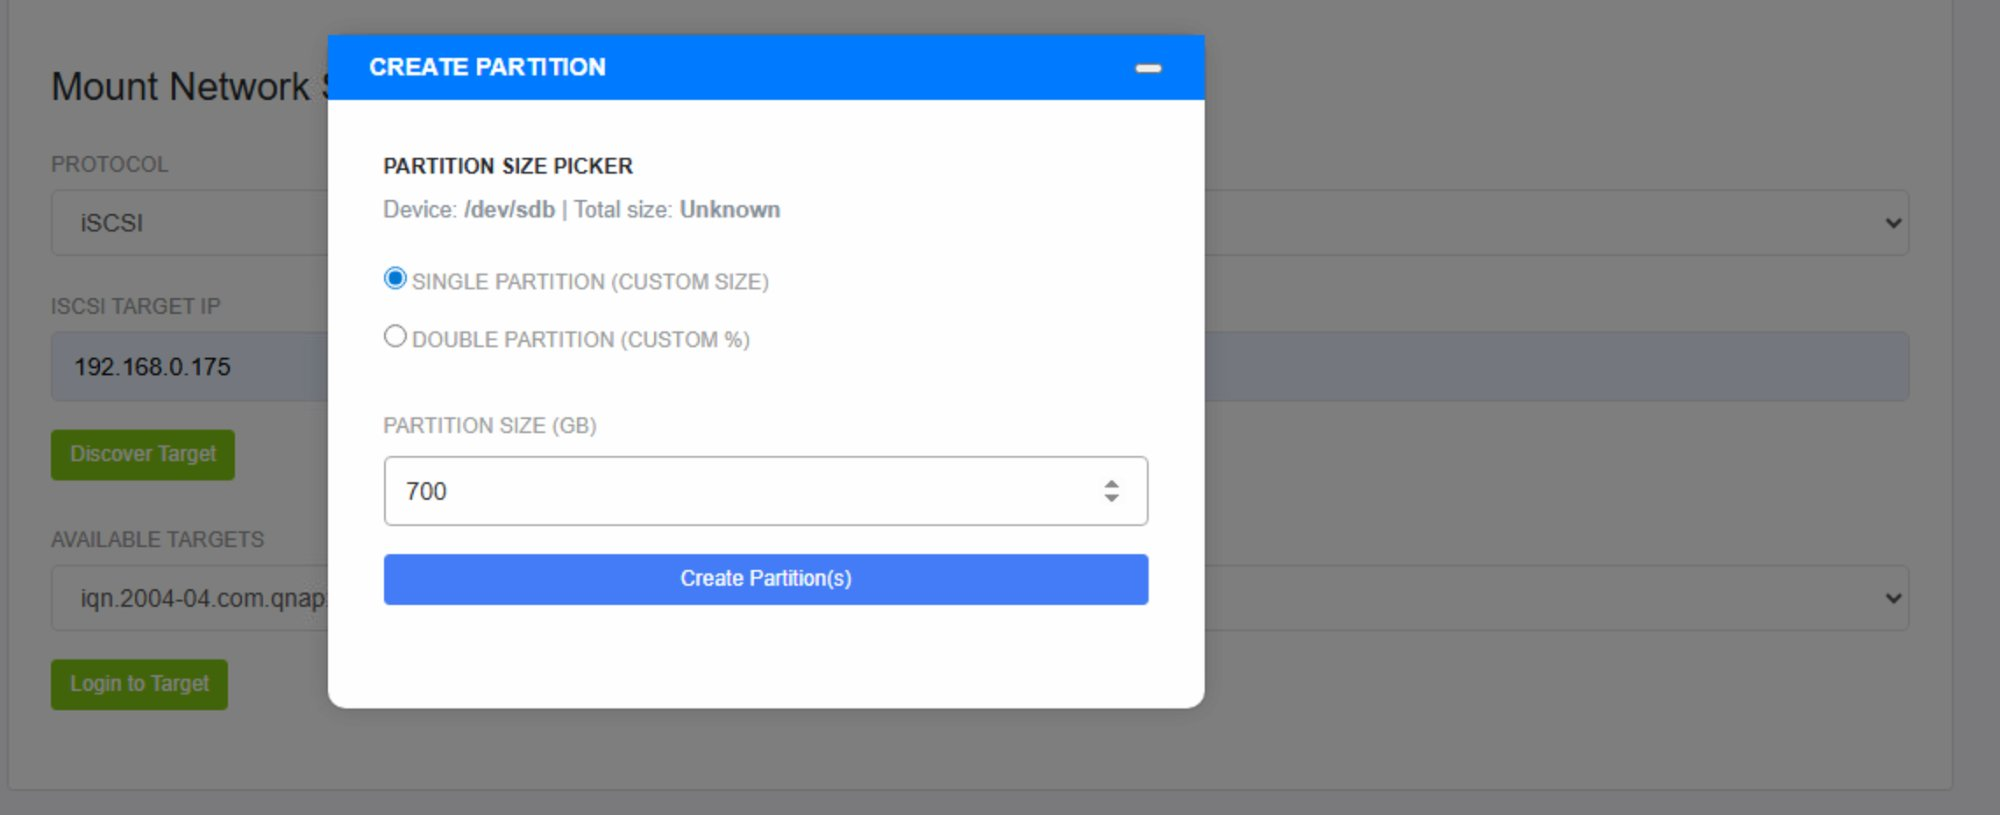
Figure 13 — Create Partition dialog
| Element | Description |
|---|---|
| CREATE PARTITION | A popup dialog that appears after successful iSCSI login to configure storage partitioning. |
| PARTITION SIZE PICKER | The section used to define how the iSCSI device will be partitioned. |
| Device | Shows the system device name assigned to the iSCSI target. Example: /dev/sdb |
| Total size | Shows the total capacity of the connected iSCSI device. Displays "Unknown" if the device size cannot be detected. |
| SINGLE PARTITION (CUSTOM SIZE) | Creates one partition of a specified size in GB. Select this option for a single dedicated backup volume. |
| DOUBLE PARTITION (CUSTOM %) | Splits the device into two partitions based on percentage. Useful for separating backup data across two volumes. |
| PARTITION SIZE (GB) | Enter the desired partition size in gigabytes. Example: 700 (creates a 700 GB partition). |
| Create Partition(s) button | Click this blue button to apply the partition configuration and create the partition(s) on the iSCSI device. |
Step 4 — Partition Created Successfully
After clicking Create Partition(s), G-Immute processes the partition request. Once complete, a confirmation popup appears confirming the partition was created successfully.
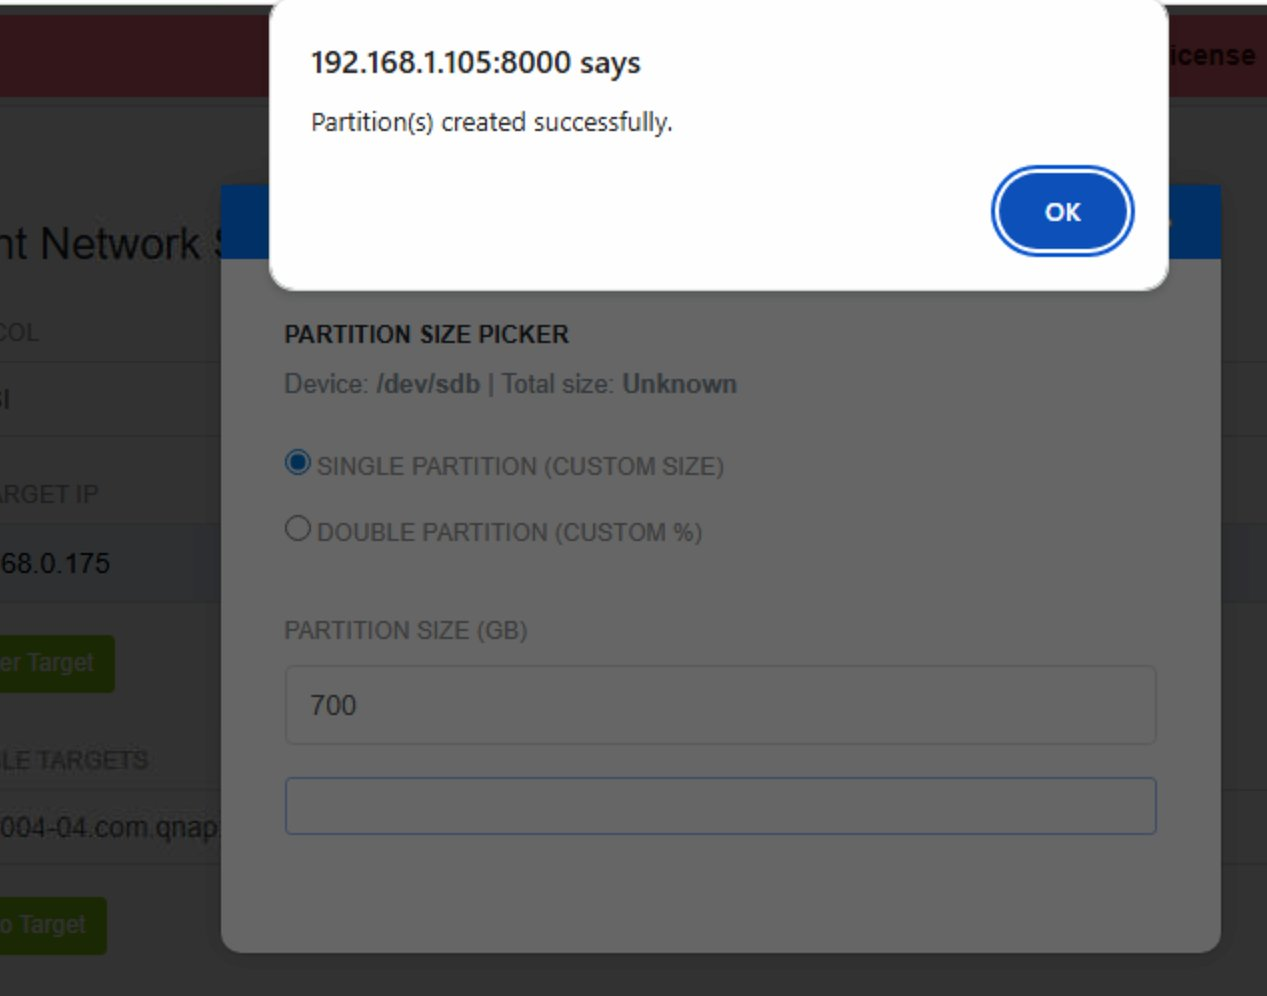
Figure 14 — Partition(s) created successfully confirmation
| Element | Description |
|---|---|
| Confirmation popup | A browser dialog confirms the partition operation completed successfully. |
| Message shown | "Partition(s) created successfully." — the iSCSI device has been partitioned and is ready for use. |
| OK button | Click OK to dismiss the dialog. The partitioned iSCSI storage is now available as a backup repository in G-Immute. |
Once the partition is created, the iSCSI storage device is ready to be used for backup jobs in G-Immute. No further configuration is required.
Step 5 — iSCSI Active Session — Partition View
After the partition is created successfully, the Storage page updates to show the iSCSI session details. The connected target and its partitions are listed in the iSCSI section.
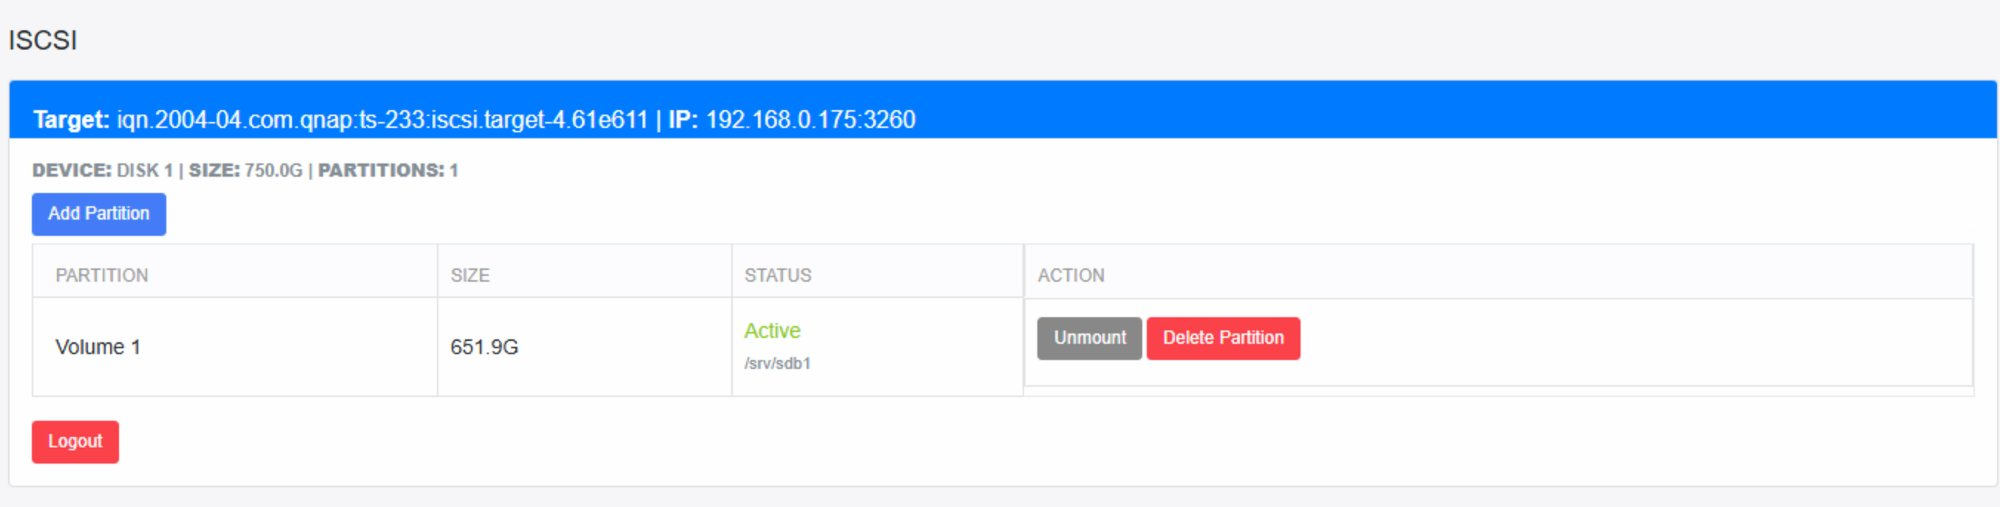
Figure 15 — iSCSI active session showing partition details
| Element | Description |
|---|---|
| Target (Blue bar) | Shows the connected iSCSI target IQN and IP address. Example: iqn.2004-04.com.qnap:ts-233:iscsi.target-4.61e611 | IP: 192.168.0.175:3260 |
| DEVICE | The system device name assigned to the iSCSI disk. Example: DISK 1 |
| SIZE | Total capacity of the connected iSCSI device. Example: 750.0G |
| PARTITIONS | Number of partitions created on the device. Example: 1 |
| Add Partition button | Click to add another partition to the iSCSI device. |
| PARTITION | Name of the partition. Example: Volume 1 |
| SIZE (partition) | Size of the individual partition. Example: 651.9G |
| STATUS | Current state of the partition. "Active" (green) means it is mounted and ready at the shown path. Example: /srv/sdb1 |
| Unmount button | Click to unmount the partition from G-Immute without deleting the data. |
| Delete Partition | Click to permanently delete the partition and all its data from the iSCSI device. |
| Logout button (Red) | Click to log out from the iSCSI target and disconnect the session completely. |
Unmounting an iSCSI Partition
To unmount a partition, click the Unmount button next to it in the partition table. G-Immute will unmount the partition and display a confirmation popup.
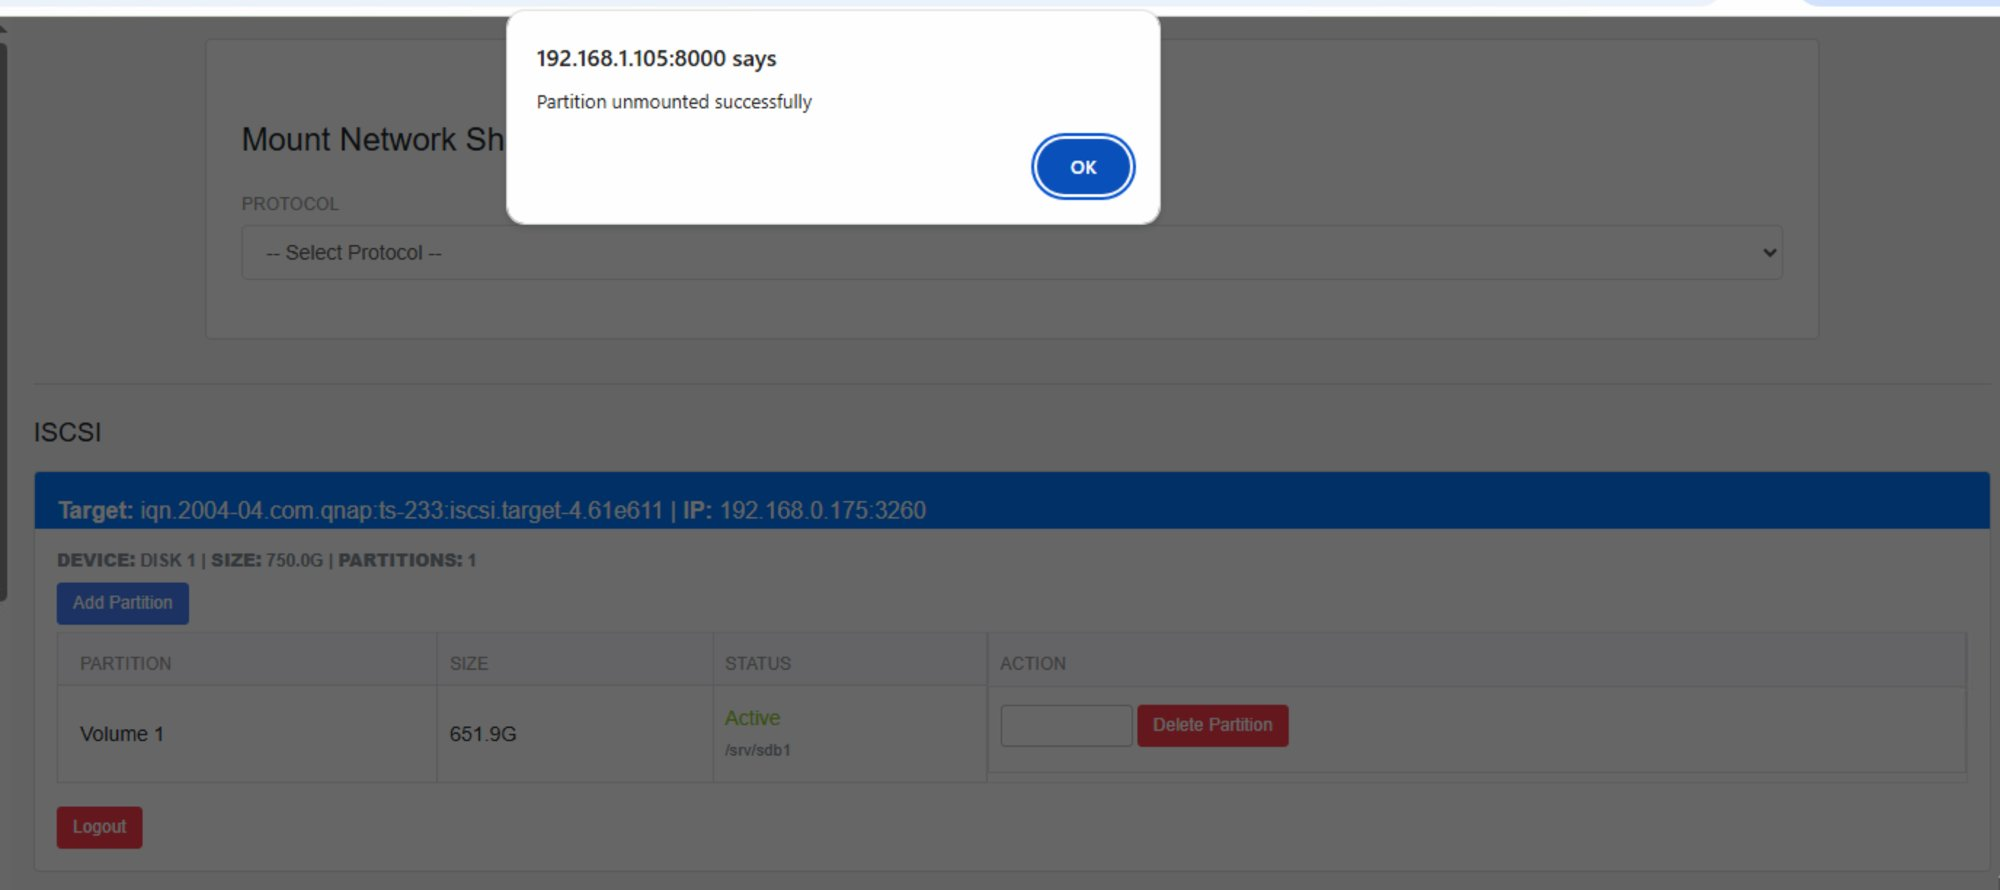
Figure 16 — Partition unmounted successfully confirmation
| Element | Description |
|---|---|
| Confirmation popup | A browser dialog confirms the partition has been successfully unmounted. |
| Message shown | "Partition unmounted successfully" — the partition is no longer mounted on G-Immute. |
| OK button | Click OK to dismiss the dialog. The partition status will update in the iSCSI session table. |
Unmounting a partition does not delete the data on it. The partition remains on the iSCSI device and can be re-mounted at any time by logging back in to the target.
After Unmount — Partition Not Active
After unmounting a partition, the iSCSI session table updates to show the partition status as Not Active. Three action buttons are now available to manage the partition.
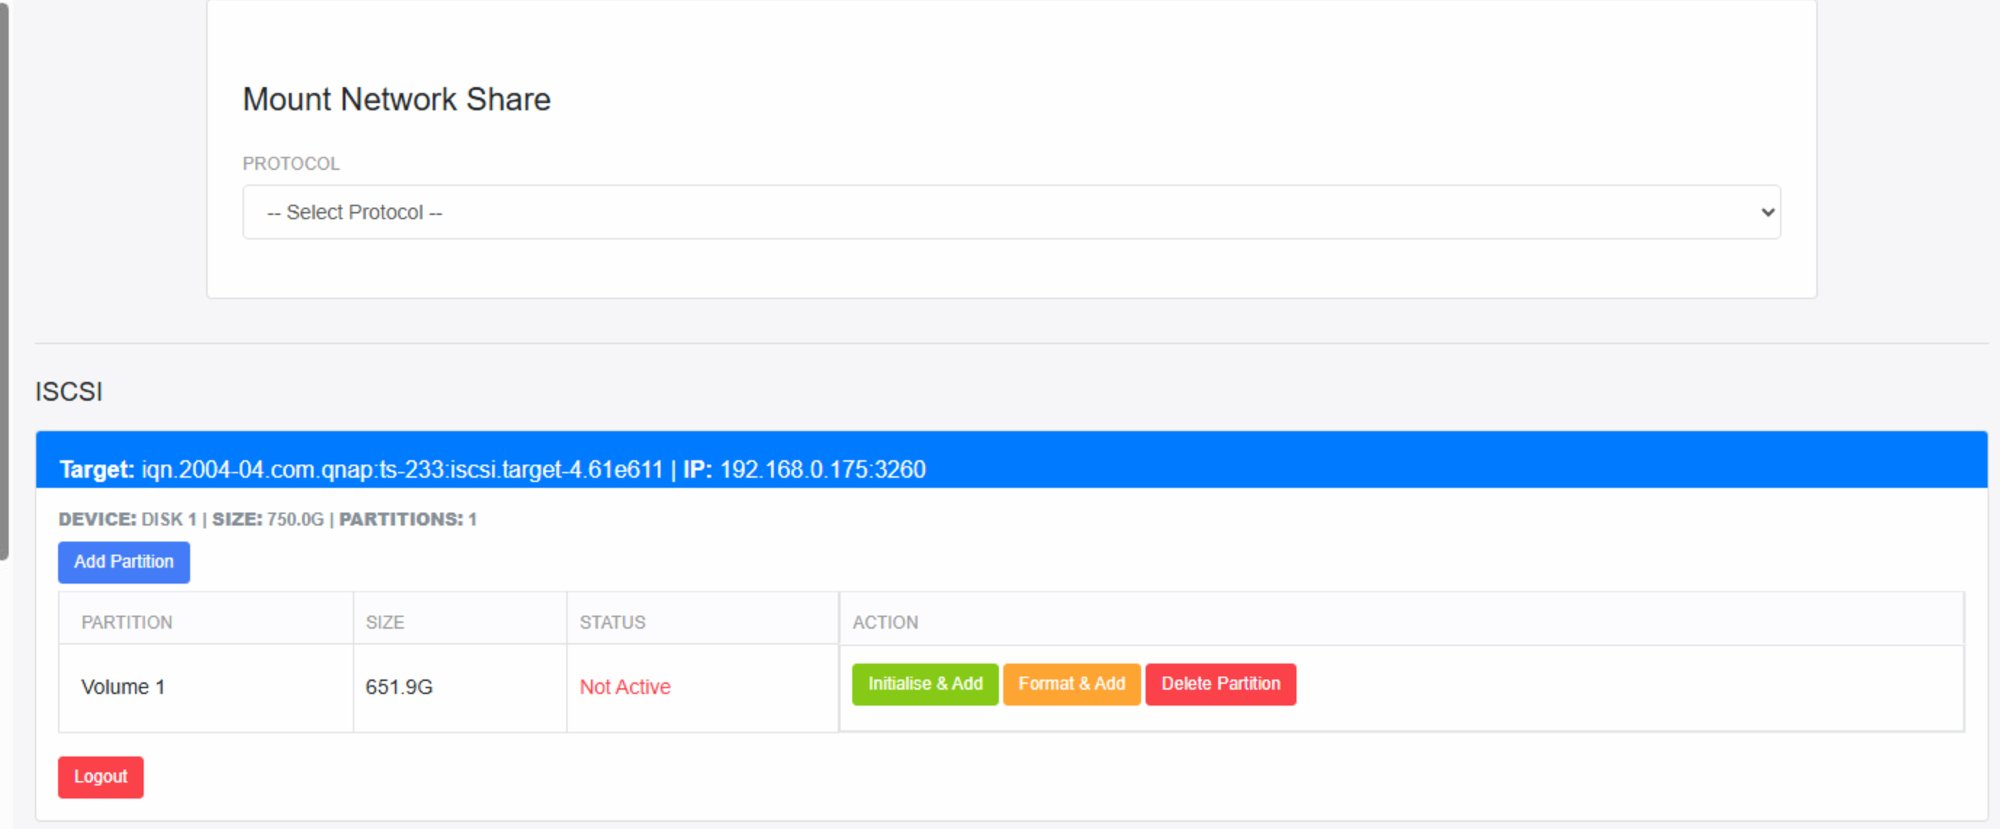
Figure 17 — iSCSI partition in Not Active state after unmounting
| Element | Description |
|---|---|
| STATUS — Not Active | Shown in red — the partition exists on the device but is not currently mounted or accessible by G-Immute. |
| Initialise & Add (Green) | Re-mounts and initialises the partition with a selected folder type. Use this to re-activate an unmounted partition. |
| Format & Add (Orange) | Formats the partition first and then mounts it. WARNING: This will erase all existing data on the partition. |
| Delete Partition (Red) | Permanently deletes the partition and all its data from the iSCSI device. This action cannot be undone. |
Step — Select Folder Type (Initialise & Add)
When Initialise & Add is clicked, a Select Folder Type dialog appears. Choose the backup software type that will use this partition, then click Initialise & Add to re-mount and activate the partition.
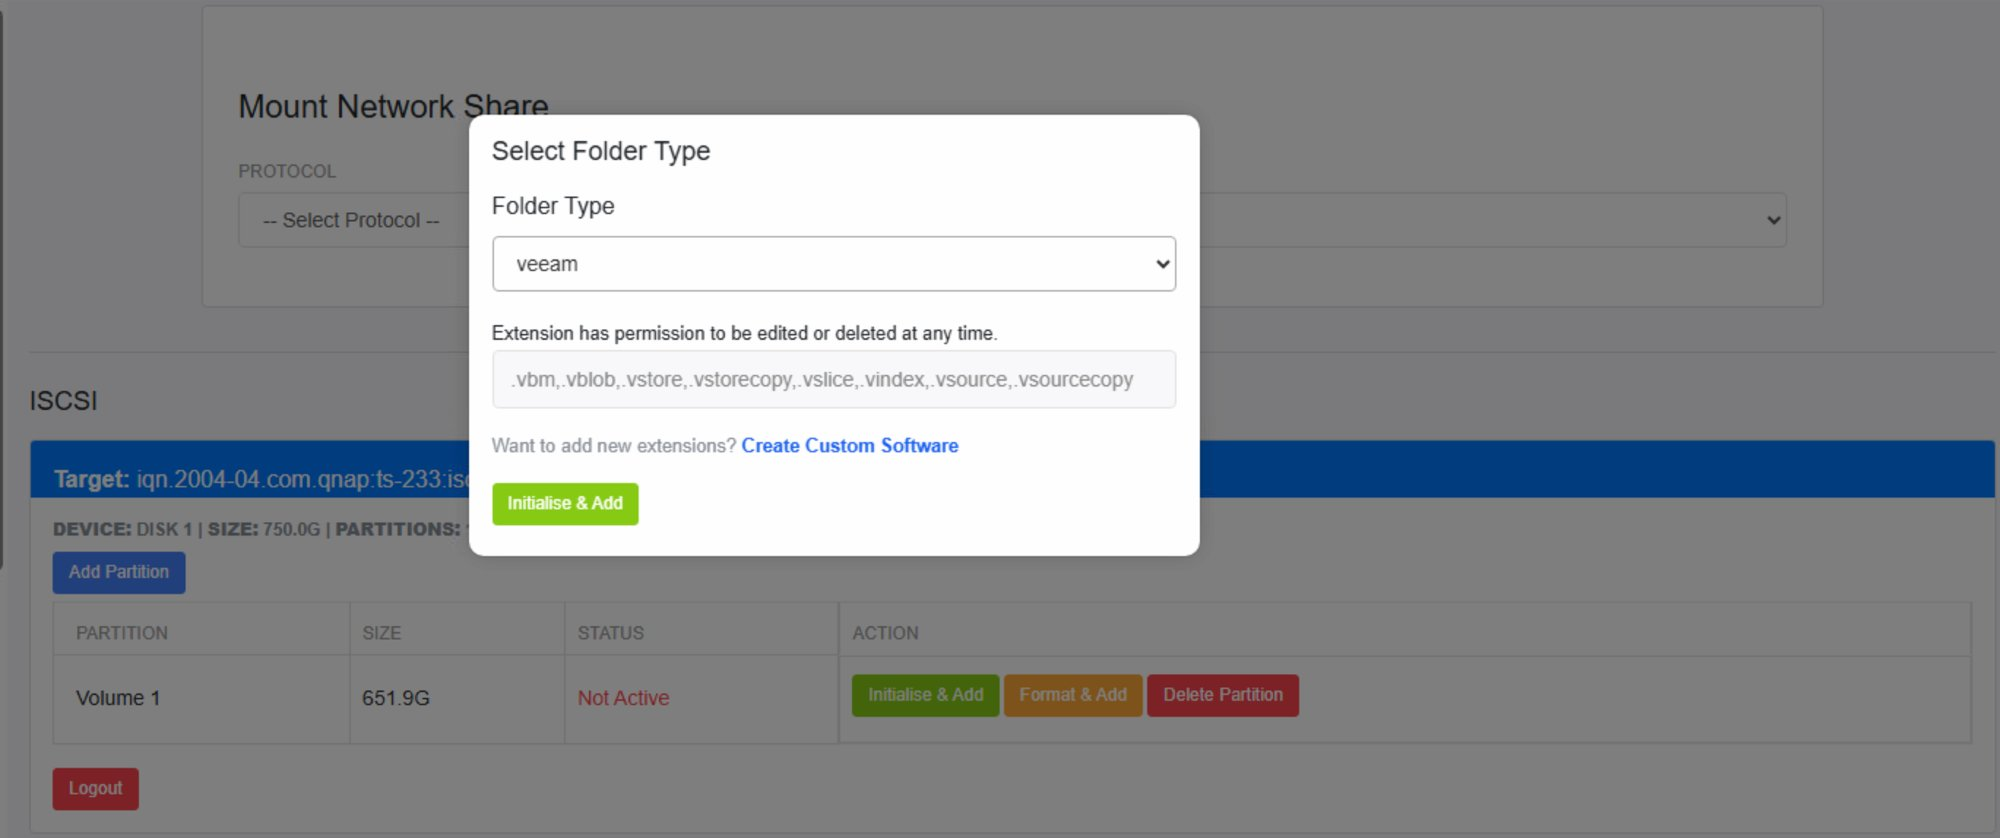
Figure 18 — Select Folder Type dialog for Initialise & Add
| Element | Description |
|---|---|
| Select Folder Type dialog | A popup that appears when Initialise & Add is clicked. Used to configure the folder type for the partition. |
| Folder Type dropdown | Select the backup software type. Example: veeam. This determines which file extensions are managed on the partition. |
| Extensions | File extensions that G-Immute has permission to edit or delete. Example: .vbm, .vblob, .vstore, .vstorecopy, .vslice, .vindex, .vsource, .vsourcecopy |
| Create Custom Software | Click this link to add new custom file extensions not in the default list. |
| Initialise & Add button | Click this green button to confirm the folder type and re-mount the partition on G-Immute. |
Partition Mounted and Initialized Successfully
After clicking Initialise & Add, G-Immute mounts and initialises the partition. A confirmation popup appears confirming the operation was successful.
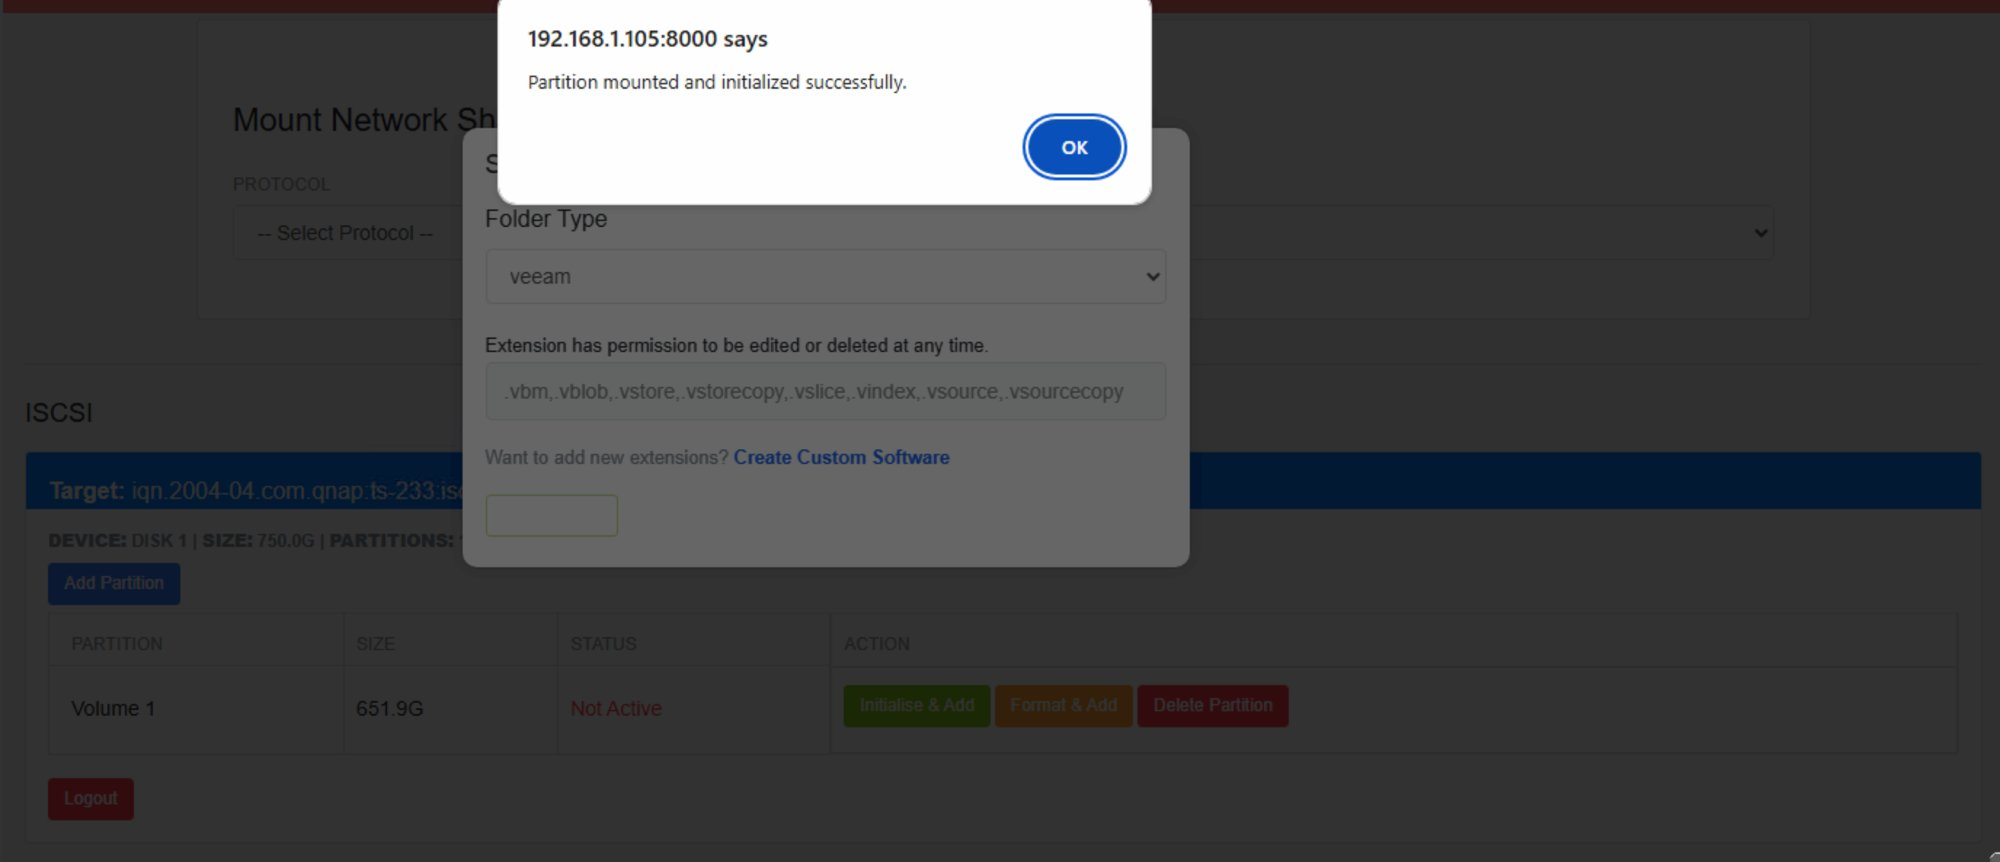
Figure 19 — Partition mounted and initialized successfully
| Element | Description |
|---|---|
| Confirmation popup | A browser dialog confirms the partition has been successfully re-mounted and initialised. |
| Message shown | "Partition mounted and initialized successfully." — the partition is now Active and ready for backup jobs. |
| OK button | Click OK to dismiss. The partition status will return to Active (green) in the iSCSI session table. |
After initialising, the partition is Active and fully ready for use as a backup repository. The folder type you selected determines which backup file extensions G-Immute will manage on this partition.
Deleting a Partition
To permanently delete a partition from the iSCSI device, click the Delete Partition button (red) in the partition table. G-Immute will delete the partition and display a confirmation popup.
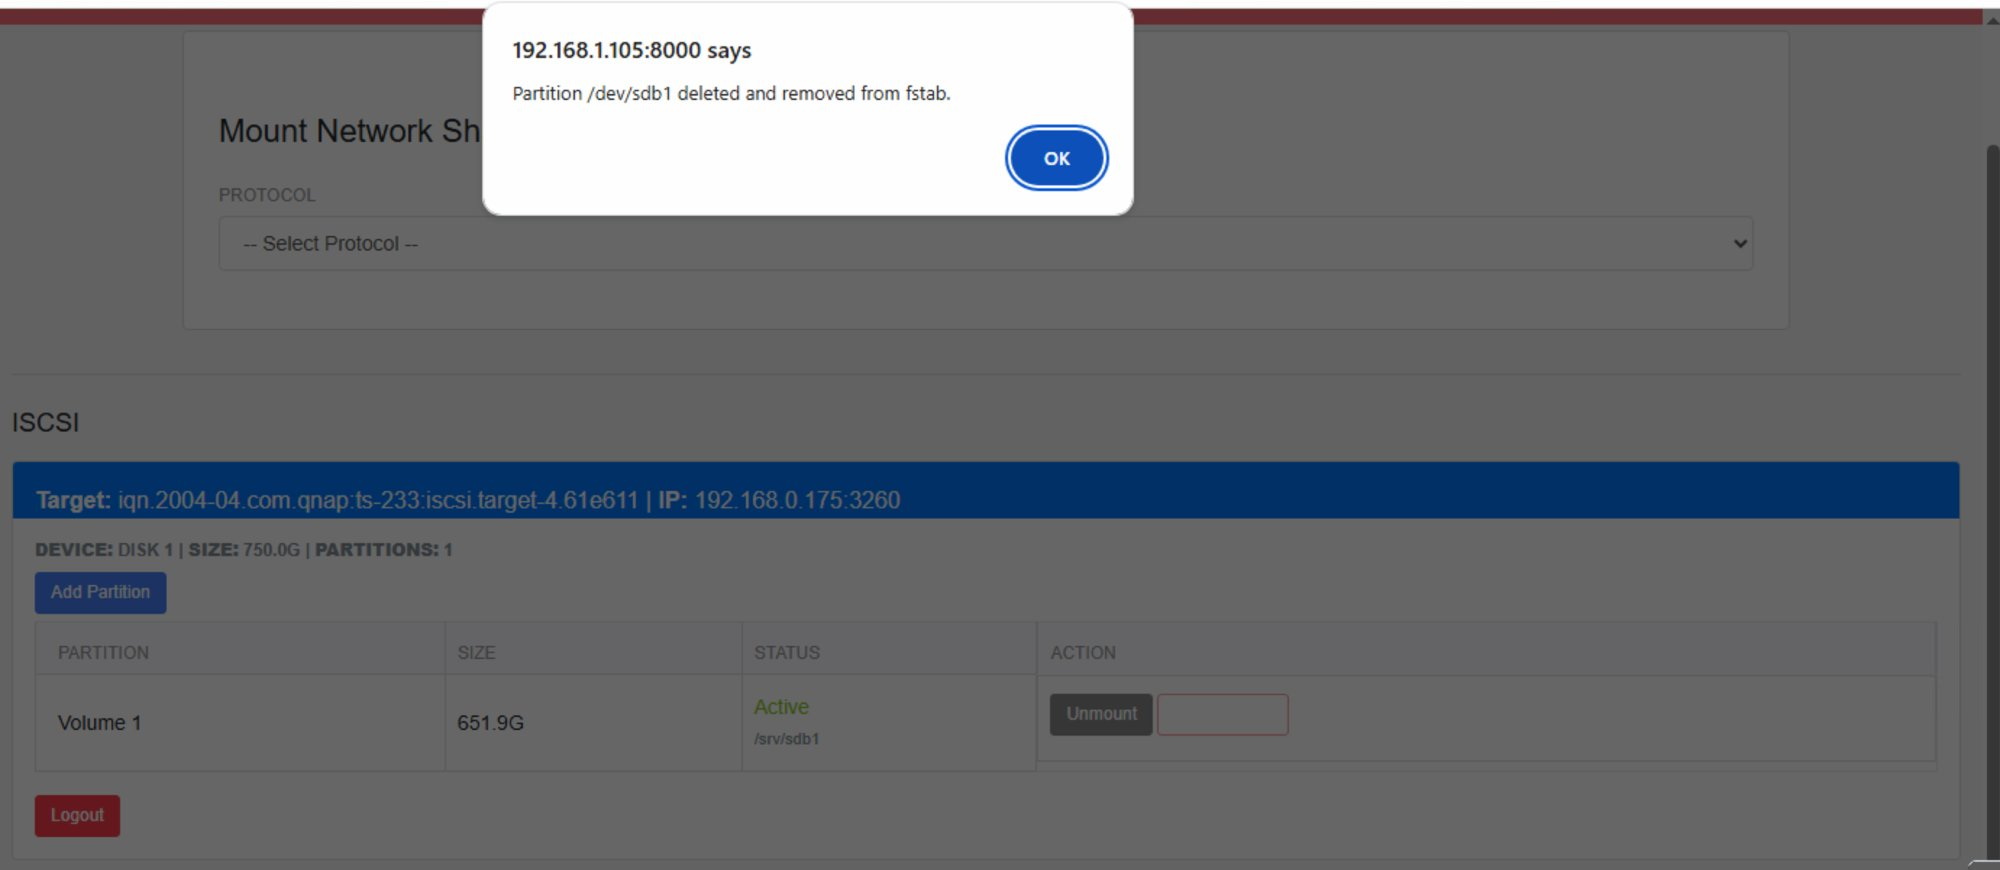
Figure 20 — Partition deleted and removed from fstab
| Element | Description |
|---|---|
| Confirmation popup | A browser dialog confirms the partition has been permanently deleted from the iSCSI device. |
| Message shown | "Partition /dev/sdb1 deleted and removed from fstab." — the partition is removed from the system and will no longer appear in the partition table. |
| OK button | Click OK to dismiss. The partition table will update to reflect the deletion. |
Deleting a partition permanently removes all data stored on it. This action cannot be undone. Always take a backup before deleting a partition.
Logging Out of iSCSI Target
To disconnect from the iSCSI target completely, click the red Logout button at the bottom of the iSCSI session. G-Immute will log out and display a confirmation popup. After logout, the session resets and shows "No partitions found" with a Create Partition button ready for a fresh setup.
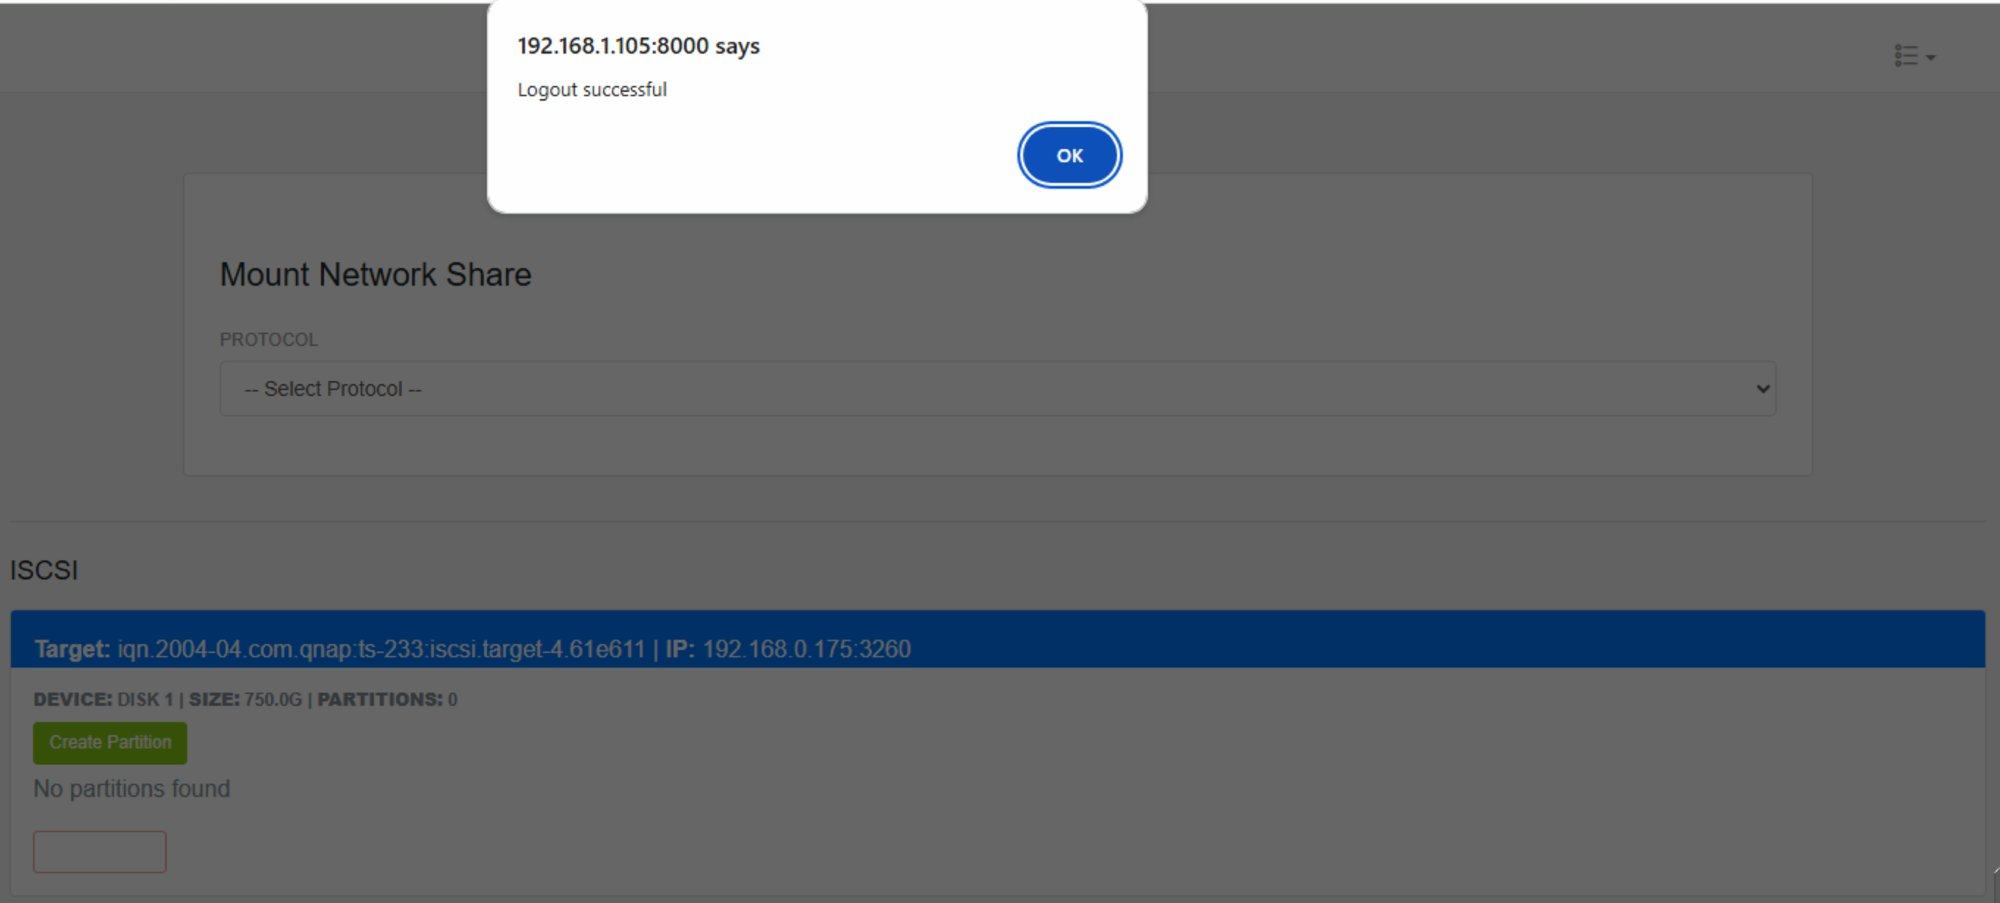
Figure 21 — Logout successful — iSCSI session cleared
| Element | Description |
|---|---|
| Confirmation popup | A browser dialog confirms the iSCSI target logout was successful. |
| Message shown | "Logout successful" — G-Immute has disconnected from the iSCSI target. |
| OK button | Click OK to dismiss the dialog. |
| PARTITIONS: 0 | After logout and partition deletion, the device shows 0 partitions remaining. |
| No partitions found | Confirms there are no partitions currently on the iSCSI device. |
| Create Partition button (Green) | Click to start a fresh partition setup on the iSCSI device from scratch. |
After logging out, the iSCSI target remains available on the network. You can log back in at any time using the iSCSI form and clicking Discover Target to reconnect.